26 -AngularJS Routing Tutorial using ngRoute
http://websystique.com/angularjs/angularjs-routing-tutorial-using-ngroute/
AngularJS Routes enable us to implement multiview SPAs [Single Page Applications]. A multiview application would consist of multiple views[HTML Templates where each template is associated with a specific route] which would be loaded dynamically as a result of user action (clicking a link, typing a specific URL in browser e.g.). Using routing, AngularJS application can show different content based on which route is selected. Routes are basically bookmark-able URL’s to specific content [specific view] of AngularJS application. ( Routing kullanarak, istediğimiz bir html element'in içeriği dinamik olarak değiştirilebilir. Örneğin, kullanıcı 4 tane link'den birine basınca, sayfadaki div element'inde bir içerik set edilir, başka bir link'e basınca div element'indeki içerik tekrar değişir.. AngularJS Route'lar, bize multiview SPA implement etmemize izin verir. Örneğin bir sayfada birden fazla view olabilir, yani birden fazla HTML template olabilir, herbir template specific bir route ile ilişkilendirilmiş olabilir. Kullanıcının seçimine göre(tıkladığı link'e göre) HTML template'lerin içeriği dinamik olarak load edilir. Kullanıcının seçtiği route'a göre ekranda gösterilen içerik dinamik olarak değişebilir. Route'lar bookmark edilebilir.)
Hashbang URL’s
AngularJS Routing leverages hashbang URLs, meaning that routes are added after # in URL. For example, normally URL looks like http://www.angularapp.com/first/page. In a Single-Page Application, however, it would usually look like http://www.angularapp.com/#/first/page. This is due to the fact that Browser treats URL with # differently than standard URL.
( url'deki # işaretinden sonraki gelen kısım route'dur.
Normal bir URL şöyledir -> http://www.angularapp.com/first/page
Bir Single Page Application'ın url'i ise şöyledir -> http://www.angularapp.com/#/first/page
Browser bu iki URL'e farklı davranır. )
Thus following URLs will all make same request to server:
( Yukarıda 3 url'den hangisine tıklarsak tıklayalım, # işaretinden sonraki kısım ignore edilip server'a aynı request gönderilir, http://angularapp.com adresine request gönderilir. AngularJS, gelen response'a bakıp route'a göre template'in içeriğini dinamik olarak load eder. )
When User clicks on any of these links (or directly types them in the browser) , same request (http://angularapp.com/) is sent to the server. Any URL fragment after the # sign gets ignored by the browser in the server call. It becomes the job of client to deal with part of URL after the #. AngularJS in this case will look at the route [part of URL after the #] and decide which HTML template to load. (Aşağıdaki örnekte 4 tane link vardır. Kullanıcı bu link'lerden hangisine basarsa bassın, veya url'e kendisi yazıp enter'a bassın, server'a gönderilen request aynıdır. Browser server'a request göndereceği zaman, url'deki # işaretinden sonra gelen kısımları ignore eder. Client tarafında, server'dan gelen response'a bakılır, AngularJS url'in # işaretinden sonraki kısmına yani route'a bakıp hangi HTML template'i yükleyeceğine karar verir. )
Let’s see a quick and simple example showing AngularJS routing, before diving into details.
 |
Şimdi daha detaya girelim, adım adım inceleyelim :
1.Including the AngularJS Route Module source code in Application’s HTML
Very first step is to include the Javascript containing source code of routing module. It can be included in head or body section ( İlk adım olarak, routing module'ünü içeren Javascript source kodunu include etmeliyiz. Bunu head veya body kısmında include edebiliriz. )
2.Include the ngRoute module as a dependency of our main AngularJS app module
angular.module('routingDemoApp',['ngRoute'])
|
Next step is to include the ‘ngRoute’ module as a dependency to the main module. It is required before we can use anything from this routing module in our code. ( 2. adım ise, routingDemoApp module'üne dependency olarak ngRoute module'ünü eklemektir. ngRoute modülündeki herhangi bir şeyi kullanabilmek için, routingDemoApp modülüne dependency olarak ngRoute modülünü ekleriz. )
3.Using ngView directive
<div ng-view></div>
|
Next step is to mark which section of the page AngularJS should change when the route changes. With the ngRoute module, this is done using the ng-view directive in the HTML. Please note that with ngRoute, there can be only One ng-view per application. If your application demands more, you should prefer ui-router over ngRoute. ( 3. adımda ise, route değiştiğinde AngularJS sayfasındaki hangi kısmın değişmesini istiyorsak belirtiriz. Bu, ngRoute modülündeki ng-view directive kullanılarak yapılır. ng-route kullanırsak her uygulama için sadece bir tane ng-view olabilir. Eğer uygulamamızda daha fazla ng-view'e ihtiyacımız varsa, ui-router kullanmalıyız. )
4.Configure $routeProvider
Define our routes in the config section using the $routeProvider service. Below is the simplest configuration to configure routes using @routeProvider. ( config() method'unda, $routeProvider service'i modülümüze inject ederiz. Sonra ise $routeProvider service'inin when ve otherwise() fonksiyonlarını çağırarak route'larımızı tanımlıyoruz. Current url'in sonuna #/ gelirse ng-view directive'in olduğu element'i içeriğine 'This is the default Route' yazılır. Sonra sırayla current url'in sonuna /computers mı gelmiş, /printers mı gelmiş diye bakılır; otherwise current url'in sonuna #/ gelmesi condition'ının sonucu gerçekleşir. Aşağıda $routeProvider service kullanılarak route'ları tanımlamanın - configure etmenin basit bir örneği gösterilmiştir, inceleyelim. )
module.config(['$routeProvider', function($routeProvider){
$routeProvider
.when('/',{template:'This is the default Route'})
.when('/computers',{template:'This is the computers Route'})
.when('/printers',{template:'This is the printers Route'})
.otherwise({redirectTo:'/'});
}]);
|
AngularJS module’s config() function is used to configure the routes. config function takes an array as parameter where the last element is the definition function while the others are dependencies to be injected which will eventually be used in definition function. In this case, $routeProvider dependency is injected. ( AngularJS modülünün config() fonksiyonu kullanılarak route'lar tanımlanabilir(configure edilebilir). config() fonksiyonu parametre olarak bir array alır. Bu array'in son elemanı definition function'dır, diğer elemanları ise bu modül'ün dependency'leridir, bu modüle inject edilecekler ve böylece definition function'da kullanılabileceklerdir. Yukarıdaki case'de, $routeProvider service inject edilmiştir. Bunu alternatif olarak şöyle de yapabiliriz (https://thinkster.io/a-better-way-to-learn-angularjs/config-function ) : config method'una parametre olarak sadece definition function'ı veririz. Controller'ımıza ise $route service inject ederiz, bu routeProvider olarak inject edilir arka planda.
angular.module('myApp', ['ngRoute'])
/*.config(function($routeProvider){
$routeProvider.when("/",
{
templateUrl: "app.html",
controller: "AppCtrl",
controllerAs: "app"
}
);
})
*/
.controller('AppCtrl', function($route) {
$route.routes["/"] = {
templateUrl: "app.html",
controller: "AppCtrl",
controllerAs: "app"
}
var self = this;
self.message = "The app routing is working!";
});
)
The $routeProvider provides us when(path,object) & otherwise(object) functions in order to define all routes in one place. The when function takes two arguments:
- First argument is a URL or a URL regex that specifies when this particular route is applicable.
- The second is a route configuration object that specifies what needs to happen when the particular route is encountered.
In our example, we kept it simple by telling AngularJS to load only a certain HTML template that we specify inline, when that route is encountered. Configuration object provides many configuration options to configure. We will go in details in the next section.
The otherwise function is a catch-all function which specifies what AngularJS needs to do if the user tries to go to a URL that is not specified in the configuration. It takes configuration object as the argument. Most of the time, however, you will see that otherwise function takes redirectTo as a key which will simply redirect any unknown URL to the route mentioned in value of redirectTo key.
( $routeProvider service route'ları tanımlayabilmemiz için şu 2 method'u sağlar :
- when(path,object)
- otherwise(object)
Bu method'ları kullanarak route'ları tanımlarız. when fonksiyonu 2 tane argument alır. 1.argument URL veya URL regex'dir; bu route'a gidilmesi için hangi URL'e gidilmesi gerektiğini belirtir.
2.argument, kullanıcı bu URL'e gitmişse ne yapılacağını belirtir.
Bu örnekte, template: kullanılmıştır, template'in değeri ng-view directive'in olduğu element'e yazdırılır. Bunun yerine templateURL: "app.html" gibi bir şey de diyebiliriz, bu durumda ng-view directive'inin olduğu element'e app.html load edilir. )
Route Configuration Object in detail
Previous example was very simple where we simply loaded different templates for different routes, and nothing else. The AngularJS route definition allows us to define more complex templates. The $routeProvider.when function takes a URL or URL regular expression as the first argument, and the route configuration object as the second.
( Önceki örnek çok basitti farklı route'lar için farklı template'ler load edilen bir örnek gördük, AngularJS ile route tanımlarını kullanarak daha komplex template tanımlayabiliriz. )
The syntax with route configuration object is as follows:
$routeProvider.when(url, {
template: string,
templateUrl: string,
controller: string, function or array,
controllerAs: string,
redirectTo: string, function,
resolve: object<key, function>
});
|
Each key is explained below:
template: When the HTML to be displayed is not very large, we can inline it as a string, using ‘template’ as a key and this string as a value in configuration object. AngularJS directly inserts this template HTML into the ng-view directive.
.when( '/computers' , { template : 'This is the computers Route' })
|
This loads the content specified with template key into the ng-view.
( template -> key , 'This is the computer Route' -> value . template'in içeriğini ng-view'e load ederiz. ng-view'de göstermek istediğimiz HTML büyük değilse, template key'ini kullanırız. )
templateUrl: When the HTML to be displayed is complex and large, it’s better to break them into separate templates/files, and give the URL to the HTML file as the templateUrl. AngularJS loads the HTML file from the server when it needs to display the particular route.
$routeProvider.when('/computers', {
templateUrl: 'views/computers.html',
});
|
This fetches views/computers.html from the server and loads it into the ng-view.
( ng-view'e load etmek istediğimiz HTML complex ise, bunu ayrı bir HTML dosyasında yazarız, ve templateURL key kullanırız, templateURL key'in değeri olarak da bu html'i söyleriz. ng-view'e söylediğimiz HTML load edililir. Yukarıdaki örnekte, currenturl#/computers adresine gidersek, ng-view directive'inin olduğu HTML element'e views/computers.html load edilir. )
controller : Using controller key, we can define the controller to be used for a particular route. There are two ways we can define the controller to be used for a particular route.
( Belirli bir route için kullanılacak controller'ı tanımlamak için, controller key'ini kullanırız. Belirli bir route için kullanıcak olan controller'ı 2 farklı yolla tanımlamak mümkündür. Daha önce yaratılan bir controller'ı kullanarak ve inline controller tanımlayarak, particular bir route için bir controller tanımlayabiliriz. )
- In case the controller has already been defined using module.controller() function in the application, we can just specify the name of controller, and that controller code would be accessible from within route template. ( module.controller() diyerek daha önce yaratılmış olan AppController1 isimli bir controller var diyelim, bu durumda controller:'AppController1 as ctrl' diyerek controller key'ine değer olarak 'AppController1 as ctrl' diyerek controller'ın ismini veririz, bu controller'a artık ctrl diyerek de erişebiliriz, aslında synonym tanımlamış gibi olduk diyebilirz. Artık bu route'da kullanılacağımız template'den, controller'a erişebiliriz. )
//earlier in application
App app = angular.module('myApp',['ngRoute'])
app.controller('AppController1', [function() {
var self = this;
self.message= 'Hello';
self.doSomething = function() {
self.message = 'Bye';
};
}]);
app.config(['$routeProvider', function($routeProvider){
$routeProvider
.when('/',{template:'This is the default Route'})
.when('/computers',{template:'This is the computers Route. And the message is {{ctrl.message}}',
controller:'AppController1 as ctrl' })
.when('/printers',{template:'This is the printers Route'})
.otherwise({redirectTo:'/'});
}]);
|
- Other case is to define the controller inline, right along with route.
$routeProvider.when('/computers', {
template: 'This is the computers Route',
controller: ['$log', function($log) {
$log.log('Computers route has been loaded!');
}]
});
|
- In above example, we have defined the controller definition inline with the route. One drawback of this approach is that we can not reuse the template if we wanted to, without duplicating the code.
Controller key kullanma konusunu tekrarlayalım:
There are two ways in which we can define the controller for a particular route. This is an optional argument in the $routeProvider.when definition, in case we have not directly defined the controller in the HTML using the ng-controller directive. If the controller has already been declared using the angularApp.con troller("MyCtrl") syntax, we can specify the name of the controller as a string. The controller key can also use the ng-controller’s controllerAs syntax, so we can use it like MyCtrl as ctrl in the controller key for the route definition. The other option is to define the controller inline, in which case we pass the con‐ troller function directly to the controller key. We can also use the array syntax to inject our dependencies in a way that is uglification-safe. ( Particular bir route için controller tanımlanın 2 yolu vardır. $routeProvider.when tanımında controller key'ini kullanmak optional'dır. )
The code might look something like:
$routeProvider.when('/test', {
template: '<h1>Test Route</h1>',
controller: ['$window', function($window) {
$window.alert('Test route has been loaded!'); }] });
In this example, we define a route that has an inline controller with a dependency on the $window service. All the route does is show a window alert on load. It is recommended that we use the controller syntax to define our controllers; defining it inline will make it hard to write unit tests or reuse it in other routes.
controllerAs: You can use controllerAs syntax in case you don’t want to name the controller using ‘as’ syntax with ‘controller’ key [as we did in previous example. The two route definitions in the following example are equivalent in terms of functionality: (Yukarıdaki örneklerde controller'ı tanımlarken controller: 'AppController as ctrl' demiştik. Bunun yerine controller:'AppController' controllerAs:'ctrl' de diyebiliriz. Her iki yolu da seçebiliriz, her iki yolda aynıdır fonksiyonellikte hiçbir fark yoktur. )
$routeProvider
.when('/computers',{template:'This is the computers Route. And the message is {{ctrl.message}}',
controller:'AppController1 as ctrl'})
$routeProvider
.when('/',{template:'This is the default Route'})
.when('/computers',{template:'This is the computers Route. And the message is {{ctrl.message}}',
controller:'AppController1',
controllerAs:'ctrl'
|
It’s your personal preference which one you should choose.
redirectTo: There might be cases where you want to redirect to a different URL [For example, some URL has been moved,or does not exist anymore]. In those cases, ‘redirectTo’ key comes handy. It is specially useful in error handling.
$routeProvider.when('/computers', {
template: 'This is the computers Route.'
});
$routeProvider.when('/desktops', {
redirectTo: '/computers'
});
|
In above example, AngularJS will open /#/computers when user enters either /#/computers or /#/desktops in the browser. (Kullanıcı /#/computers adresine de gitmeye çalışsa /#/desktops adresine gitmeye çalışsa da /#/computers adresi açılacaktır ekranda. )
resolve: Resolves provides us a way to define a set of asynchronous tasks to execute before the route is loaded.
In case any of the asynchronous tasks is not successful, route will not be loaded. It is a handy way to check for example if a user is logged in and has authorization before accessing a protected route. A resolve is a set of keys and functions. Each function can return a value or a promise.
(Particular route load edilmeden önce gerçekleşmesini istediğimiz asynchronous task'lar varsa bunları route tanımda resolve keyword'ünü kullanarak yapabiliriz. Örneğin, #/login route'una gidilebilmesi için önce authorization ile ilgili asynchronous task'ların gerçekleşmesini isteyebiliriz, gerçekleşmesini istediğimiz asynchronous task'ları resolve keyword'ü ile belirtiriz. Bu durumda route'a gidilebilmesi için asynchronous task'ların başarılı bir şekilde tamamlanması şarttır. Asynchronous task'lar başarılı bir şekilde tamamlanmazsa, route load edilmez. Bu özellik sayesinde örneğin, kullanıcının log in olup olmadığı, protected route'a erişmeye yetkisinin olup olmadığı check edilir, sonuca göre protected route load edilir veya edilmez. Resolve key'ine key ve function değerleri verilir. Her key için olan fonksiyon bir value veya promise return edebilir. )
Let’s see this using more realistic setup:

In above example, when user tries to access /item/computers, resolves comes in action. It has a set of key [it has named 'async' here but you can name anything you want] and function. There can be more than one key:function in one resolve definition. function in this example takes a user defined service ‘ItemService’ as a dependency and calls fetchAllItems function which send a request to server. In this particular scenario, resolve returns a promise, which is passed in controller here. In case the server returns unsuccessful response, route will not be loaded. In case the server response in success [list of items], route gets loaded. ( Kullanıcı /item/computers'a erişmeye çalıştığında, bu route'a gidebilmesi için resolve çalışır. resolve keyword'ünün değeri set of key and function'dır. Bu örnekteki fonksyion, aşağıda tanımladığımız ItemService'i dependency olarak alır. Bu service'deki fetchAllItems fonksiyonunu çağırır. Bu fonksiyonda server'a request gönderilir. Server'da gelen response'ın status'ü 200 ise, then fonksiyonunun 1.parametresindeki fonksiyon çalışır, değilse then fonksiyonunun 2. parametresindeki fonksiyon çalışır. )
Access route params using $routeParams service
Routes can have parameters. These parameters can then directly be accessed in controllers using AngularJS #routeParams service. Let’s take an example:

In above example, route is defined as /route/:id. Look at : followed by a variable. This is an indication for AngularJS routing that there will be a value after the /route in the URL that should be stored and further make available in controller using $routeParams service.
For example, URL’s like /route/12345?a=2&b=3 will match the route /route with id 12345 and query string variables a & b. Now those values can be accessed in controller code using $routeParams service. Any parameter [preceded by ':'] in route can be accessed in controller by it’s name using $routeParams.paramName. Additionally, any query string passed in URL can be accessed in controller using $routeParams.variableName
( Örneğin, /route/12345?a=2&b=3 url'ine gidersek, id,a ve b parametreleri şu değerlere sahip olur : id=12345, a=2,b=3 . Bu variable'lara controller'dan erişilebilir. )
related resources :
http://viralpatel.net/blogs/angularjs-routing-and-views-tutorial-with-example/
http://twofuckingdevelopers.com/2014/07/angularjs-best-practices-003-routeprovider/
27 - routeParams and ng-template
http://viralpatel.net/blogs/angularjs-routing-and-views-tutorial-with-example/
Dividing the application in Views and using Routing to load different part of app makes the app more manageable. ( Uygulamayı view'lere bölmek ve uygulamanın farklı parçalarını load etmek için routing kullanmak uygulamayı daha manageable yapar. )
Routing helps you in dividing your application in logical views and bind different views to Controllers. (Routing sayesinde uygulamamızı logical view'lere böleriz, ve herbir view'i istediğimiz controller'a bind ederiz.)

In above diagram we create two Route url /ShowOrders and /AddNewOrder. Each points to a specific view and is managed by a controller. ( 2 tane route url yarattık, herbir route specific bi view'e işaret eder. Herbir route bir controller tarafından yönetilir. )
1. Introduction to $routeProvider
The magic of Routing is taken care by a service provider that Angular provides out of the box called $routeProvider.
Routes in Angular are declared via the $routeProvider, which is the provider of the $route service. This service makes it easy to wire together controllers, view templates, and the current URL location in the browser. ( Bir route, $routeProvider kullanılarak declare edilir. $routeProvider, $route service'in provider'ıdır. module'e veya service $route service'i inject ederiz, sonra app.provider()'a routeProvider'ı inject ederiz. )
Syntax to add Routing
sampleApp isimli bir module tanımlarız. $routeProvider'ı configure etmek için config() method'unu kullanırız. $routeProvider'ın when() ve otherwise() method'larını kullanırız.
sampleApp isimli bir module tanımlarız. $routeProvider'ı configure etmek için config() method'unu kullanırız. $routeProvider'ın when() ve otherwise() method'larını kullanırız.
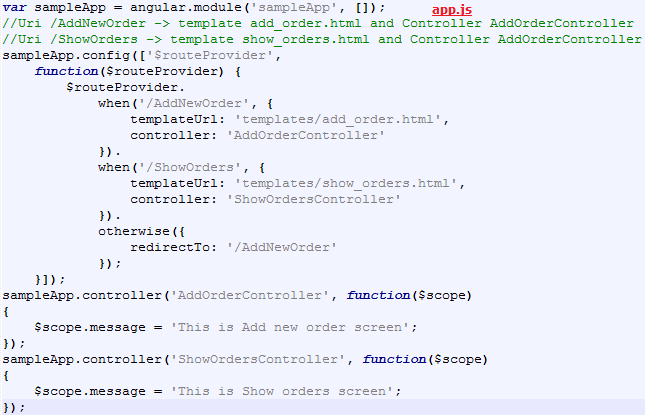
var sampleApp = angular.module('phonecatApp', []);
sampleApp .config(['$routeProvider',
function($routeProvider) {
$routeProvider.
when('/addOrder', {
templateUrl: 'templates/add-order.html',
controller: 'AddOrderController'
}).
when('/showOrders', {
templateUrl: 'templates/show-orders.html',
controller: 'ShowOrdersController'
}).
otherwise({
redirectTo: '/addOrder'
});
}]);
|
Yukarıdaki kodda 2 tane url tanımladık : /addOrder ve /showOrders . Bu url'leri sırayla şu view'lere map ettik : templates/add-order.html ve templates/show-orders.html
Browser'da şu url'i açtığımızda http://app/#addOrder , Angular bu url'in map ettiği route'u bulur ve add-order.html template'i load eder. Sonra view'imiz için olan mantığı ekleyebileceğimiz AddOrderController'ı invoke ederiz.
1.1. Hello World AngularJS + Routing
Aşağıdaki örnekte runtime'da farklı template'ler load edilmektedir. Bu örneğin module kodunu section 1.2'de göreceğiz. Şimdilik view kodundaki yani aşağıdaki html kodundaki mantığı anla sadece.

ng-view
Each view referred by the route is loaded in this section of document. ( Herbir route'un refer ettiği view, sayfanın bu kısmına load edilir. )
You can define ng-view in html file in one of the below way :
<div ng-view> </div>
..
<ng-view> </ng-view>
..
<div class="ng-view"> </div>
|
1.2. Add Routing in AngularJS
In above sample1.html file we included a javascript file app.js which holds the application logic. Below is the content of app.js.
We first use .config() method to define $routeProvider configuration. Also in the same file we define two controllers AddOrderController and ShowOrdersController. ( config() method'unda $routeProvider service'i kullanırak configuration yaptık. Ayrıca aynı dosyada 2 tane controller tanımladık : AddOrderController ve ShowOrdersController .)
In case routeProvider does not matche with any url, it redirects to default route.
otherwise ({
redirectTo: '/AddNewOrder'
});
|
1.3. Add HTML template files
Örneğimizdeki html template'leri tanımlayalım :
templates/add_order.html
<h2>Add New Order</h2>
{{ message }}
|
templates/show_orders.html
<h2>Show Orders</h2>
{{ message }}
|
2. How to pass Parameters in Route Urls
Consider below scenario. We want to display details of different orders. Based on a parameter order_id we will define order details in view. ( Aşağıdaki senaryoyu inceleyelim. Farklı siparişlerin detaylarını göstermek istiyoruz. Herbir sipariş için unique bir order_id olduğunu düşünelim.url'deki order_id'ye göre siparişleri view'de göstereceğiz. )

Route'u tanımlarken, url'de :orderId olacak diyoruz:
when('/ShowOrder/:orderId', {
templateUrl: 'templates/show_order.html',
controller: 'ShowOrderController'
});
|
Bu parametre'yi şöyle okuruz :
$scope.order_id = $routeParams.orderId;
|
Örnek bir uygulama yapalım. Aşağıdaki sample2.html siparaiş bilgilerini bir tabloda gösterir. Herbir siparişin yanında "Show Details" diye bir link vardır. This link uses parametrize route url to load order detail screen.

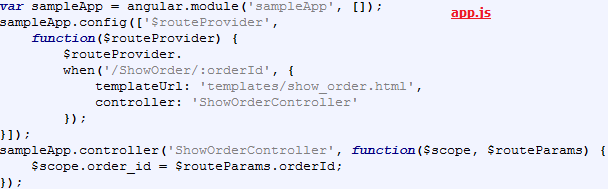
Note: Don’t forget to inject $routeParam parameter in controller. Otherwise you wont be able to use it. (Controller'ımıza $routeParam inject etmeyi unutmamalıyız.)
templates/show_order.html
<h2>Order #{{order_id}}</h2>
Here are the details for order <b>#{{order_id}}</b>.
3. How to Load local views (Views within script tag)
It is not always that you want to load view templates from different files. Sometimes the view templates are small enough that you might want them to put inside main html instead of keeping them in separate html files. ( view template'leri farklı dosyalara yazmak zorunda değiliz. Aynı dosyaya da yazabiliriz view template'leri, nasıl peki? ng-template directive'ini kullanarak. )
3.1 ng-template directive
You can use ng-template to define small templates in your html file. For example (küçük template'leri tanımlamak için ng-template directive kullanırız. Sanki farklı bir dosyada tanımlanmış gibi olur. Şu örneği inceleyelim ) :
<script type="text/ng-template" id="add_order.html">
<h2> Add Order </h2>
{{message}}
</script>
|
Here we defined a template “add_order.html” inside <script> tag. Angular will automatically load this template in ng-view whenever add_order.html is referred in route.( Aşağıdaki örnekte, add_order.html isimli bir template tanımladık <script> tag'ları arasında. add_order.html 'e refer edilen bir route seçilirse, ng-view'e add_order.html view'i load edilir. )
ng-template directive'ini kullanan bir örnek inceleyelim :
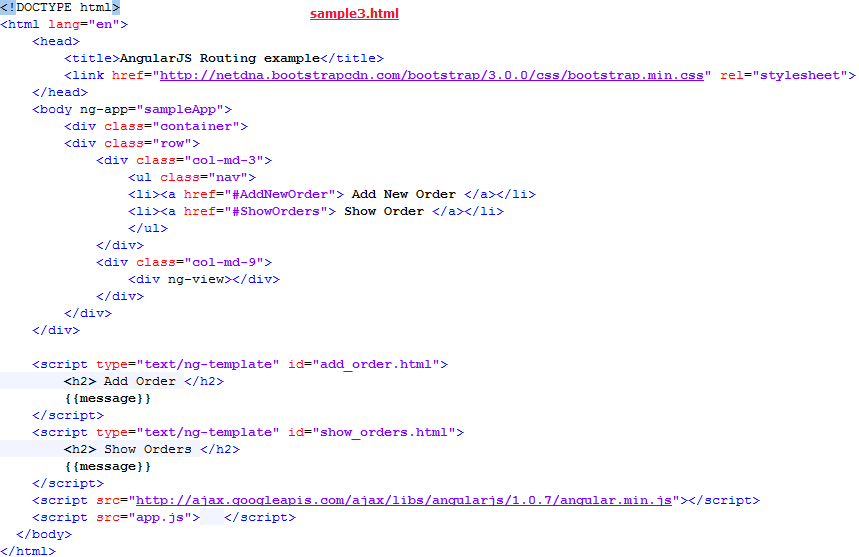
The app.js is similar to first sample. There is no change in app.js. Refer to first demo example if you wanna check app.js.
4. Add Custom Data to RouteProvider
Sometimes we might want to pass custom data based on certain route. For example, you might use same Controller in different routes and use some custom data. ( $routeProvider service şu 2 method'a sahiptir : when() ve otherwise(). Bu method'ları kullanarak url route'ları tanımlarız. Bazen belirli bir route'a göre belirli bir data göndermek, pass etmek isteyebiliriz. Örneğin, farklı route'larda aynı Controller'ı kullanabiliriz. )
Örnek :
when('/AddNewOrder', {
templateUrl: 'templates/add_order.html',
controller: 'CommonController',
foodata: 'addorder'
}).
when('/ShowOrders', {
templateUrl: 'templates/show_orders.html',
controller: 'CommonController',
foodata: 'showorders'
});
sampleApp.controller('CommonController', function($scope, $route) {
//access the foodata property using $route.current
var foo = $route.current.foodata;
alert(foo);
});
|
28 - resolve in routeprovider
resolve
The final configuration, and most versatile and complex of the route configuration options, is the resolve. Resolves are a way of executing and finishing asynchronous tasks before a particular route is loaded. This is a great way to check if the user is logged in and has authorization and permissions, and even preload some data before a controller and route are loaded into the view.
( Route configuration seçeneklerinin karmaşık olanı resolve'dur. Asynchronous task'lar çalıştırılıp bitirilince, particular bir route load edilir. Böylece bir kullanıcının login olup olmadığı gerekli yetkiye sahip olup olmadığı check edilir, gerekli yetkiye sahipse route view'e load edilir. )
Using Resolves for Pre-Route Checks
When we define a resolve, we can define a set of asynchronous tasks to execute before the route is loaded. A resolve is a set of keys and functions. Each function can return a value or a promise. A sample resolve, which makes a server call and returns a hardcoded value, is shown here: ( Bir resolve tanımlarken, route load edilmeden önce çalışıp bitmesi gereken bir veya daha fazla asynchronous task tanımlarız. Bir resolve, key ve fonksiyon çiftlerinin kümesidir. Resolve'daki herbir fonksiyon, value veya promise return edebilir. Örnek bir resolve, server'ı çağırır ve bir değer return eder. )
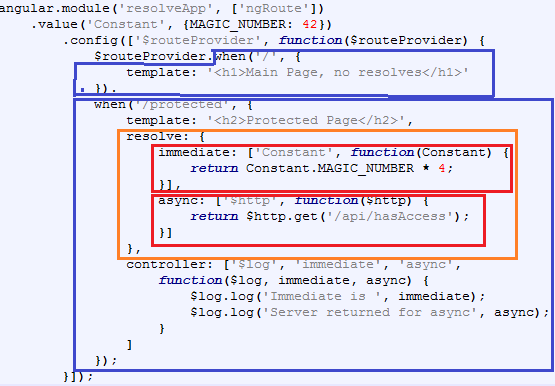
This example expects that there is a server-side API available at /api/hasAccess, which on a GET request returns a status 200 response if the user has access, and a nonstatus 200 response if the user does not have access. ( Bu örneğin düzgün çalışabilmesi için /api/hasAccess adresinde bir server-side API available olmalıdır. Eğer kullanıcının bu URL'e erişim yetkisi varsa kullanıcı bu URL'e GET Request gönderdiğinide server'dan gelen response'ın status'ü 200'dür. Kullanıcının bu URL'e erişim yetkisi yoksa server'dan gelen response'ın status'ü 200'den farklı bir değerdir. )
There are two routes in this example. The first route is a very standard route that loads an HTML template when the route definition is encountered. We have no resolves on this route, so it always loads properly. ( Bu örnekte 2 tane route vardır. 1.route'da resolve yoktur, dolayısıyla bu route'u seçersek HTML template view'e load edilir. )
The second definition contains a resolve defined with two keys, immediate and async. Note that these are keys of our own choosing, so this could very well be myKey1 and myKey2. AngularJS does not expect or force us to use any particular key. Each key takes an array, which is the AngularJS Dependency Injection syntax. We define the dependencies for the resolve in the array, and get it injected into the resolve function. The first resolve key, immediate, gets the Constant dependency injected into it, and returns a constant value multiplied by some number. The second resolve key, async, gets the $http dependency injected into it, and makes a server call to /api/hasAccess. It then returns the promise for that particular server call.
(2.route'da ise resolve vardır. Resolve'un değeri 2 elemanlı bir object'dir. Bu object'in herbir elemanı key/value çiftidir. Bu elemanların key i sırayla immediate ve async'dir. Bu key isimlerini kendi kafamızdan seçtik. Her bir key bir array alır, tabi bu AngularJS Dependency Injection syntax' a göredir. Bu syntaxa uymak istemezsek her bir key bir fonksiyon da alabilir. Şimdi bu syntaxa uyduğumuzu ve dolayısıyla key'in array aldığını düşünelim, resolve fonksiyonuna önce dependent service'leri inject ederiz, sonra bu servisleri resolve fonksiyonunun içinde kullanırız. 2.resolve key'e bakalım, bu fonksiyona $http service inject edilir. Sonra /api/hasAccess url'e get request gönderilir $http.get('/api/hasAccess') diyerek. $http.get('/api/hasAccess'), promise return eder.)
AngularJS guarantees the following:
• If the resolve function returns a value, AngularJS immediately finishes executing
and treats it as a successful resolve. (resolve function, value return ederse, resolve fonksiyon çalışması biter ve successful bir resolve olur.)
• If the resolve function returns a promise, AngularJS waits for the promise to return
and treats the resolve as successful if the promise is successful. If the promise is
rejected, the resolve is treated as a failure. (resolve function, promise return ediyorsa, AngularJS bu promise'in return etmesini bekler, promise başarılı bir şekilde return ederse resolve da başarılı olmuş olur. promise fail olursa resolve da fail olmuş olur.)
• Because of the resolve function, AngularJS ensures that the route does not load
until all the resolve functions are finished executing. If there are multiple resolve keys that make asynchronous calls, AngularJS executes all of them in parallel
and waits for all of them to finish executing before loading the page. ( Route'un view'e load edilmesi için, resolve fonksiyonunun çalışmasının bitmesi beklenir. Asynchronous call yapan birden fazla resolve key varsa, AngularJS bunları paralel olarak çalıştırır ve sayfayı load etmeden önce bunların başarılı bir şekilde bitmesini tamamlanmasını bekler. )
• If any of the resolves encounter an error or any of the promises returned are rejected (is a failure), AngularJS doesn’t load the route.
In the previous example, because the immediate resolve key is returning only a value, it is treated as a successful resolve every time.( immediate resolve key, value return ettiği için bu her zaman successful bir resolve olarak değerlendirilir.)
The async resolve key makes a server call, and if it is successful, the route is loaded. If the server returns a non-200 status response, AngularJS doesn’t load the page. AngularJS still loads and caches the template if any of the resolves fail, but the controller associated with the route isn’t loaded and the HTML doesn’t make it into the ng-view. In these cases, the user still sees the last page he was on. So it might not be a great user experience, because the user won’t know that something went wrong. In “A Full AngularJS Routing Example” on page 150, we’ll see a full-fledged AngularJS routing example that uses resolves in a more comprehensive pattern. ( Async resolve key, server'a get request gönderir ,server'dan gelen response başarılıysa route load edilir. Başarısızsa, AngularJS template'i load etmez. Bu durumda kullanıcı safyada hiçbir değişiklik görmez,server'a giden request'in başarısız olduğundan, işlerin yolunda gitmediğinden de haberi olmaz, dolayısıyla kullanıcı bu durumdan memnun kalmaz,oluyosa oldu demek olmadıysa olmadı demek lazım iyi bir kullanıcı etkileşimi için. Bu problemi çözen bir örnek göreceğiz daha sonra. )
One other interesting thing about resolves is that we can get the value from each of the resolve keys injected into our controller, if we want or need the data. Each key can directly be injected into the controller by adding it as a dependency. This is over and above any AngularJS service dependency we might have. ( resolve key'lerinden elde ettiğimiz değerleri istersek controller'a inject edebiliriz. Bunun için bu key'leri controller'ımıza dependency olarak eklemeliyiz. )
The following items are injected into the controller:
• The value itself, if the resolve function was returning a value
• The resolution of a promise, if the resolve function was returning a promise
In the case of the async resolve, we get the resolved value of the promise, which is the response object from the server, with the config, status, headers, and data.
( Controller'a şunlar inject edilebilir : resolve function'ın return ettiği değer ve resolve function'ın return ettiği promise'in sonucu. Async key örneğimizde promise'in sonucu yani server'dan gelen response object async'e assign edilmiştir. )
This is what’s normally passed to the success function of the then of the promise (başarılı bir promise böyle gözükür genellikle):
$http.get('/api/hasAccess').then(function(response) {
console.log('I am passed to the controller', response);
return response;
});
In this case, response is the value that async will take when it is injected into the
controller. ( async isminde ve değeri response olan, ve immediate isminde ve değeri CONSTANT.MAGIC_NUMBER*4 olan iki tane value provider elde ettik bu örnekte. İstersek bu provider'lardan istediğimizi controller'ımıza inject edebiliriz. Örnek app.controller('myController', [async, immediate,function($scope, async, immediate){
..}]) )
No comments:
Post a Comment